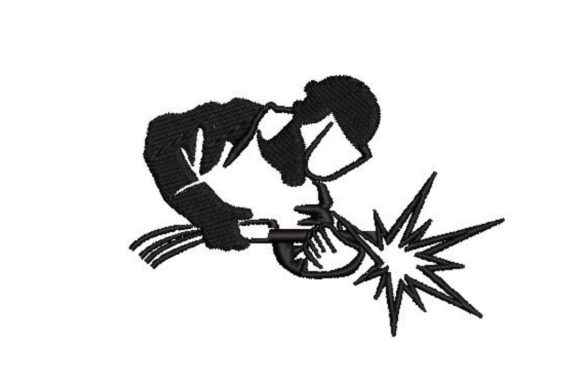
Welder Silhouette
A Bold, Confident Statement for Craft Fair Shoppers
First impression? Welder Silhouette lands as bold, modern, and instantly recognizable—no cutesy embellishments, no cluttered details. It’s clean, strong, and purpose-built for makers who value authenticity over fluff. As an embroidery designer prepping for a weekend craft fair, I immediately see its appeal: it speaks to skilled tradespeople, workshop enthusiasts, and proud DIYers without needing explanation. It doesn’t whisper—it stands shoulder-to-shoulder with your best aprons and market bags.
Where Welder Silhouette Shines on Real Craft Fair Products
This machine embroidery design thrives where utility meets identity. On a heavyweight cotton tote bag, it reads clearly from six feet away—ideal for booth signage or grab-and-go merchandise. As apron embroidery, it anchors the chest pocket area with confident scale and minimal fuss. For tea towel embroidery, it holds up beautifully on tight-weave linen or brushed cotton—especially when placed near the hem or corner for visual balance.
As an embroidered patch, Welder Silhouette gains versatility: iron-on or sew-on versions work equally well on denim jackets, tool rolls, or kids’ lunchboxes. On structured caps, it performs best centered above the visor—just avoid the curved crown unless you’ve tested stitch tension on that exact cap model. Small fabric pouches (think 5" x 7") let it shine as a focal point—not too big, not too small—and pillow covers benefit from its crisp outline when scaled to 4–5 inches wide.
What Makes It a Smart Craft Fair & Etsy Seller Pick
Welder Silhouette is inherently easy to understand at a glance. No decoding required. That’s gold for craft fairs, where shoppers browse in under 90 seconds. It works powerfully both as a small accent (e.g., 1.5" on a keychain strap) and a large focal design (up to 5.5" on a market bag). Its silhouette-based structure avoids tiny lettering or fragile linework—so it photographs sharply for printable mockups and Etsy listings, boosting click-through rates.
For batch production? Yes—it’s highly repeatable. Minimal color changes, straightforward layering, and predictable stitch density mean fewer stops mid-hooping. That translates directly to faster turnaround for your handmade product line and smoother booth restocking.
Careful-Use Notes Every Embroiderer Should Know
- Dense stitch areas: Check the welder’s helmet or jacket outline—if filled sections are tight, reduce stitch density slightly on thick fabrics like canvas or duck cloth to prevent puckering.
- Fabric texture matters: Avoid using Welder Silhouette on heavily textured tea towels (e.g., looped terry) without extra cutaway stabilizer—fine lines may blur.
- Curved surfaces: Caps and curved pouches need proper hooping technique and possibly a low-profile hoop. Always test before committing to 20+ units.
- Dark fabric contrast: The design relies on shape—not shading—so choose thread colors that pop: metallic silver, safety orange, or high-contrast navy on light backgrounds all read cleanly.
- Small sizes: Below 1.25", clarity drops. Skip micro versions for patches or tags—Welder Silhouette earns respect at scale, not shrinkage.
How It Elevates Your Booth, Brand, and Buyer Connection
At a crowded handmade market, Welder Silhouette adds instant credibility. It signals craftsmanship, intention, and niche awareness—valuable for attracting trade professionals and their families. When stitched onto a sturdy apron or embroidered tote, it subtly raises perceived product value and reinforces handmade quality. It also strengthens brand consistency if you’re building a cohesive “maker lifestyle” collection—pair it with matching patch sets or coordinating tea towel + pouch bundles.
Visually, it creates strong booth display strength: group three items—a cap, apron, and tote—with the same design placement and thread palette, and you’ve got a mini gallery wall that draws eyes and invites conversation. That’s where buyer engagement begins—not with price tags, but with recognition and resonance.
Professional Embroidery Designer Notes Before You Hoop
- Always test the design on scrap fabric—same weight, same finish—as your final product.
- Verify thread contrast in natural light; monitor screens lie, especially with metallics or heathered fabrics.
- Review spacing between elements—some versions of this design include optional gear icons; ensure they don’t crowd the main silhouette.
- Confirm hoop size compatibility with your machine and product type—especially for curved or bulky items.
- Inspect stitch density in the helmet detail—over-stitched areas can stiffen thin fabrics unnecessarily.
- Use the right stabilizer: medium-weight cutaway for stretchy knits, tear-away for stable wovens, and fusible + cutaway combo for textured towels.
- Create at least one real mockup—not just digital. See how it drapes, folds, and catches light.
- Compare fabric colors side-by-side—what reads bold on white may vanish on charcoal gray unless thread is adjusted.
- Confirm commercial licensing before selling finished products. This digital embroidery file is marketed for commercial embroidery, but always double-check terms—especially for resale on platforms like Etsy or in boutique shops.
Final Thought: A Work-Ready Design That Sells Itself
Welder Silhouette isn’t just another machine embroidery design—it’s a ready-made story for your craft fair product lineup. It fits naturally into the Work category while delivering unmistakable personality. Whether you're an Etsy seller scaling digitally or a small shop product maker stitching one-of-a-kind gifts, this design bridges function and flair without compromise. In a sea of floral monograms and generic quotes, Welder Silhouette stands out—not because it’s loud, but because it’s true.